进阶Vue篇(二)
本节主要掌握Vue组件的应用及组件间的数据交互。
为什么要实现组件化开发? 可复用、方便维护、减少不必要的更新操作
一.vue-cli项目创建
1.安装
npm install -g @vue/cli
npm install -g @vue/cli-service-global
vue create vue-online-edit
2
3
2.初始化
? Check the features needed for your project:
 (*) Babel
 ( ) TypeScript
 ( ) Progressive Web App (PWA) Support
 ( ) Router
 ( ) Vuex
>(*) CSS Pre-processors
 ( ) Linter / Formatter
 ( ) Unit Testing
 ( ) E2E Testing
2
3
4
5
6
7
8
9
10
? Pick a CSS pre-processor (PostCSS, Autoprefixer and CSS Modules are supported by default)
  Sass/SCSS (with dart-sass)
  Sass/SCSS (with node-sass)
  Less
> Stylus
2
3
4
5
二.Vue组件通信
1.常见组件通信方式
- 1)
props和$emit父组件向子组件传递数据是通过prop传递的,子组件传递数据给父组件是通过$emit触发事件来做到的 $attrs和$listenersA->B->C。Vue 2.4 开始提供了$attrs和$listeners来解决这个问题
$parent,$children
$refs获取实例
- 父组件中通过provider来提供变量,然后在子组件中通过inject来注入变量。
envetBus平级组件数据传递 这种情况下可以使用中央事件总线的方式
vuex状态管理
三.案例:Vue组件在线编辑器
- 通过props、events 实现父子组件通信
- 通过ref属性获取组件实例
1.掌握组件的基本概念
import Vue from 'vue'
import App from './App.vue'
new Vue({render: h => h(App)}).$mount('#app')
2
3
h我们一般称为
createElement,这里我们可以用他来渲染组件,App其实就是一个组件 (就是一个对象而已)
<template>
  <div id="app"></div>
</template>

<script>
export default {
  name: 'App',
}
</script>
<style lang="stylus"></style>
2
3
4
5
6
7
8
9
10
为了编写组件方便,vue提供了
.vue文件,最终这个对象会被解析为组件对象。一个组件由三部分组成:模板、逻辑、样式
2.划分组件结构
<template>
  <div id="app">
    <!-- 3.使用组件 -->
    <Edit></Edit>
    <Show></Show>
  </div>
</template>
<script>
// 1.声明组件并引入
import Edit from '@/components/edit.vue';
import Show from '@/components/show.vue';
export default {
  name: 'App',
  // 2.组件的注册
  components:{
    Edit,
    Show
  }
}
</script>
2
3
4
5
6
7
8
9
10
11
12
13
14
15
16
17
18
19
20
我们将在线编辑器划分成左右两部分,左侧用于编辑操作、右侧用于展示操作。组件的使用有三步:声明导入、注册、通过标签形式使用组件
<style lang="stylus">
* {
  margin: 0;
  padding: 0;
}

html, body, #app {
  width: 100%;
  height: 100%;
}
#app {
  display: flex;
  & > div {
    width: 50%;
    height: 100%;
  }
}
</style>
2
3
4
5
6
7
8
9
10
11
12
13
14
15
16
17
18
3.编写Edit组件
<template>
  <div class="edit">
    <div class="edit-btn">
      <button>代码运行</button>
      <button>清空代码</button>
    </div>
    <div class="edit-box">
      <textarea></textarea>
    </div>
  </div>
</template>

<script>
export default {};
</script>
<style lang="stylus">
.edit {
  .edit-btn {
    padding: 10px;
    background: #ccc;
    button {
      width: 80px;
      height: 40px;
      margin-right: 5px;
    }
  }
  .edit-box {
    position: absolute;
    top: 60px;
    left: 0;
    right: 0;
    bottom: 0;
    textarea {
      width: 100%;
      height: 100%;
      outline: none;
      border: none;
      font-size 20px;
    }
  }
}
</style>
2
3
4
5
6
7
8
9
10
11
12
13
14
15
16
17
18
19
20
21
22
23
24
25
26
27
28
29
30
31
32
33
34
35
36
37
38
39
40
41
42
4.表单元素双向绑定
<textarea @input="handleInput" :value="code"></textarea>
export default {
    data(){
        return {code:''}
    },
    methods:{
        handleInput(e){
            this.code = e.target.value
        }
    }
};
2
3
4
5
6
7
8
9
10
11
这里我们将输入框的值映射到code数据中,当然也可以使用
v-model来代替,但是在输入的过程中我们可能还要进行其他操作
思考:v-model是否真的等于input+value呢?
5.触发父组件事件
<textarea @input="handleInput" :value="code" @keydown.9.prevent="handleKeydown"></textarea>
export default {
    methods:{
        handleInput(e){
            this.code = e.target.value;
            this.$emit('input',this.code); //触发自己身上的事件
        },
        handleKeydown(e){
            if(e.keyCode == 9){
                this.code = e.target.value + '  ';
            }
        }
    }
};
2
3
4
5
6
7
8
9
10
11
12
13
14
在父组件中,给当前组件绑定事件
<Edit @input="handleInput"></Edit>
export default {
  data() {
    return { code: "" };
  },
  methods: {
    handleInput(code) {
      this.code = code;
    }
  }
};
2
3
4
5
6
7
8
9
10
11
这个其实就是典型的发布订阅模式,先在组件自己身上绑定事件(绑定的事件为父组件事件),稍后触发自己身上的事件,将数据传入给父组件的函数中,达到子父通信的效果
6.将数据传递给儿子组件
通过属性的方式将数据传递给儿子组件
<Show :code="code"></Show>
子组件接受传递过来的数据
export default {
    props:{
        code:{
            type:String,
            code:''
        }
    }
}
2
3
4
5
6
7
8
7.定义show组件
<template>
    <div class="show">
        <h2 class="show-title">运行结果</h2>
        <div class="show-box"></div>
    </div>
</template>
<script>
export default {
    props:{
        code:{
            type:String,
            code:''
        }
    },
    methods:{
        run(){
        	// 运行代码
    	}
    }
}
</script>
<style lang="stylus">
.show-title{
    line-height: 40px;
    padding-left:20px;
}
</style>
2
3
4
5
6
7
8
9
10
11
12
13
14
15
16
17
18
19
20
21
22
23
24
25
26
27
8.平级组件通信
最简单的方案可以找共同的父组件
<div class="edit-btn">
    <button @click="$emit('run')">代码运行</button>
    <button @click="code=''">清空代码</button>
</div>
2
3
4
<Edit @input="handleInput" @run="handleRun"></Edit>
这里我们可以在父组件中监控到组件点击事件了。我们需要在父组件中调用Show组件中的run方法
<Show :code="code" ref="show"></Show>
this.$refs.show.run()
2
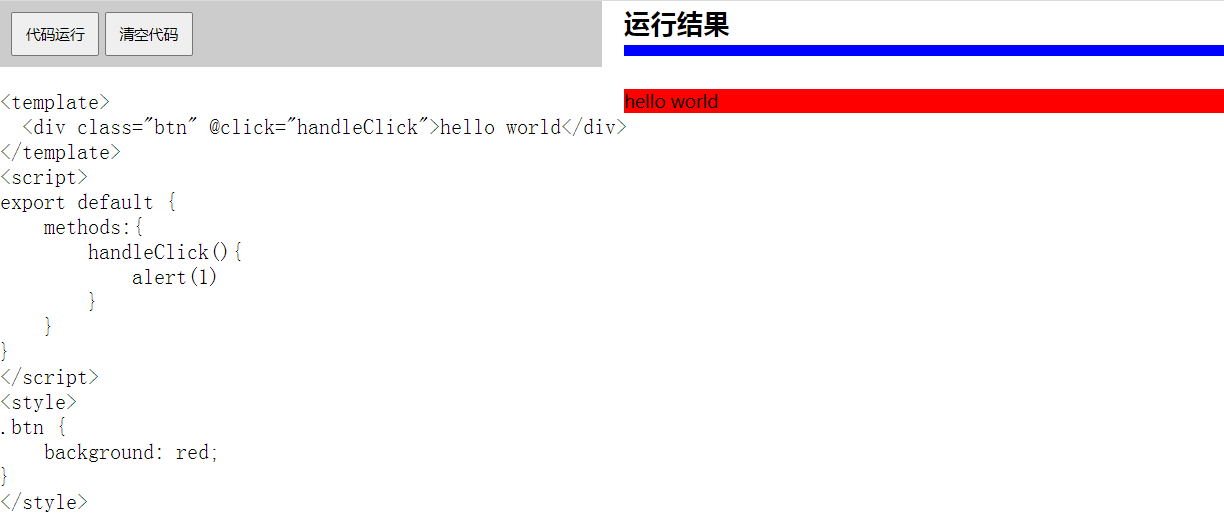
9.解析代码
<div class="show-box" ref="display"></div>
getSource(type){
    const reg = new RegExp(`<${type}[^>]*>`);
    let code = this.code;
    let matches = code.match(reg);
    if(matches){
        return code.slice(
            code.indexOf(matches[0]) + matches[0].length,
            code.lastIndexOf(`</${type}`)
        )
    }
    return ''
},
run() {
    // 运行代码
    // 1.获取 js html css逻辑
    const template = this.getSource("template")
    const script = this.getSource("script").replace(/export default/,'return');
    const style = this.getSource('style');

    if(!template){
        return alert('代码无法运行')
    }
    // 2.组合成组件
    let component = new Function(script)();
    component.template = template;


    // 3.构造组件构造器
    let instance = new (Vue.extend(component));
    this.$refs.display.appendChild(instance.$mount().$el);

    // 4.处理样式
    if(style){
        let styleElement = document.createElement('style');
        styleElement.type = 'text/css';
        styleElement.innerHTML = style;
        document.getElementsByTagName("head")[0].appendChild(styleElement)
    }
}
2
3
4
5
6
7
8
9
10
11
12
13
14
15
16
17
18
19
20
21
22
23
24
25
26
27
28
29
30
31
32
33
34
35
36
37
38
39
解析出对应的内容,采用
Vue.extend构造Vue组件,手动挂载到对应的元素上.当ref属性指定在DOM身上时,代表的是真实的DOM元素
样式补充
<style lang="stylus">
.show {
  padding-left: 20px;

  .show-title {
    line-height: 40px;
  }

  .show-box {
    border-top: 10px solid blue;
    position relative;
    padding-top: 30px;
  }
}
</style>
2
3
4
5
6
7
8
9
10
11
12
13
14
15
四.案例:表单组件的封装
- 掌握插槽的应用
- $parent、$children、provide和inject的使用
- 组件的双向数据绑定
1.表单的使用
<template>
  <div>
    <el-form :model="ruleForm" :rules="rules" ref="ruleForm">
      <el-form-item label="用户名" prop="username">
        <el-input v-model="ruleForm.username"></el-input>
      </el-form-item>
      <el-form-item label="密码" prop="password">
        <el-input v-model="ruleForm.password"></el-input>
      </el-form-item>
      <el-form-item>
        <button @click="submitForm">提交表单</button>
      </el-form-item>
    </el-form>
  </div>
</template>
<script>
import elForm from "./components/el-form";
import elInput from "./components/el-input";
import elFormItem from "./components/el-form-item";
export default {
  components: {
    "el-form": elForm,
    "el-input": elInput,
    "el-form-item": elFormItem
  },
  data() {
    return {
      ruleForm: {
        username: "",
        password: ""
      },
      rules: {
        username: [
          { required: true, message: "请输入用户名" },
          { min: 3, max: 5, message: "长度在 3 到 5 个字符" }
        ],
        password: [{ required: true, message: "请输入密码" }]
      }
    };
  },
  methods: {
    submitForm(formName) {
      this.$refs["ruleForm"].validate(valid => {
        if (valid) {
          alert("submit!");
        } else {
          console.log("error submit!!");
          return false;
        }
      });
    }
  }
};
</script>
2
3
4
5
6
7
8
9
10
11
12
13
14
15
16
17
18
19
20
21
22
23
24
25
26
27
28
29
30
31
32
33
34
35
36
37
38
39
40
41
42
43
44
45
46
47
48
49
50
51
52
53
54
这里我们参考
element-ui表单组件的使用,自己动手实现下这三个组件。通过这三个组件的应用来掌握内部通信的机制。
2.编写组件
el-form
<template>
    <form><slot></slot></form>
</template>
<script>
export default {
    name:'elForm'
}
</script>
2
3
4
5
6
7
8
el-form-item
<template>
    <div><slot></slot></div>
</template>
<script>
export default {
    name:'elFormItem'
}
</script>
2
3
4
5
6
7
8
el-input
<template>
    <input type="text">
</template>
<script>
export default {
    name:'elInput'
}
</script>
2
3
4
5
6
7
8
先写出对应的基本组件结构
3.Provide的应用
<template>
    <form><slot></slot></form>
</template>
<script>
export default {
    name:'elForm',
    provide(){
        return {elForm:this}
    },
    props:{
        model:{
            type:Object,
            default:()=>({})
        },
        rules:Object
    }
}
</script>
2
3
4
5
6
7
8
9
10
11
12
13
14
15
16
17
18
接收用户属性,并将当前组件提供出去,因为el-form 和 el-form-item 不一定是父子关系,可能是父孙关系
4.inject的应用
<template>
    <div><slot></slot></div>
</template>
<script>
export default {
    name:'elFormItem',
    inject:['elForm'],
    props:{
        label:{
            type:String,
            default:''
        },
        prop:String
    },
    mounted(){
       console.log(this.elForm)
    }
}
</script>
2
3
4
5
6
7
8
9
10
11
12
13
14
15
16
17
18
19
我们通过inject将属性注入到组件中。从而解决了夸组件通信(provide和inject不要在业务逻辑中使用)
5.组件的双向绑定
<template>
    <input type="text" :value="value" @input="handleInput">
</template>
<script>
export default {
    name:'el-input',
    props:{
        value:String
    },
    methods:{
        handleInput(e){
            this.$emit('input',e.target.value);
        }
    }
}
</script>
2
3
4
5
6
7
8
9
10
11
12
13
14
15
16
组件的v-model其实就是 input + value的语法糖
6.$parent应用
Vue在组件初始化的过程中会创造父子关系,为了方便通信我们使用$parent属性来自己封装一个$dispatch方法,用于触发对应的祖先组件中的方法
Vue.prototype.$dispatch = function (componentName,eventName) {
    const parent = this.$parent;
    while (parent) {
        let name = parent.$options.name;
        if (name == componentName) {
            break;
        } else {
            parent = parent.$parent;
        }
    }
    if(parent){
        if(eventName){
            return parent.$emit(eventName)
        }
        return parent
    }
}
2
3
4
5
6
7
8
9
10
11
12
13
14
15
16
17
handleInput(e){
    this.$emit('input',e.target.value);
    // 找到对应的formItem进行检测
    this.$dispatch('elFormItem','validate');
}
2
3
4
5
7.$on手动绑定事件
<template>
  <div>
    <label v-if="label">{{label}}</label>
    <slot></slot>
    {{errorMessage}}
  </div>
</template>
<script>
import Schema from "async-validator";
export default {
  name: "elFormItem",
  inject: ["elForm"],
  props: {
    label: {
      type: String,
      default: ""
    },
    prop: String
  },
  data(){
      return {errorMessage:''}
  },
  mounted() {
    this.$on("validate", () => {
      if (this.prop) {
        let rule = this.elForm.rules[this.prop];
        let newValue = this.elForm.model[this.prop];

        let descriptor = {
          [this.prop]: rule
        };
        let schema = new Schema(descriptor);

        return schema.validate({[this.prop]:newValue},(err,res)=>{
            if(err){
                this.errorMessage = err[0].message;
            }else{
                this.errorMessage = ''
            }
        })
      }
    });
  }
};
</script>
2
3
4
5
6
7
8
9
10
11
12
13
14
15
16
17
18
19
20
21
22
23
24
25
26
27
28
29
30
31
32
33
34
35
36
37
38
39
40
41
42
43
44
45
8.$children应用
同理:Vue在组件初始化的过程中会创造父子关系,为了方便通信我们使用$children属性来自己封装一个$broadcast方法,用于触发对应后代组件中的方法
Vue.prototype.$broadcast = function (componentName,eventName) {
    let children = this.$children;
    let arr = [];
    function findFormItem(children){
        children.forEach(child => {
            if(child.$options.name === componentName){
                if(eventName){
                    arr.push(child.$emit('eventName'))
                }else{
                    arr.push(child)
                }
            }
            if(child.$children){
                findFormItem(child.$children);
            }
        });
    }
    findFormItem(children);
    return arr;
}
2
3
4
5
6
7
8
9
10
11
12
13
14
15
16
17
18
19
20
9.调用校验方法
<template>
  <form @submit.prevent>
    <slot></slot>
  </form>
</template>
<script>
export default {
  name: "elForm",
  provide() {
    return { elForm: this };
  },
  props: {
    model: {
      type: Object,
      default: () => ({})
    },
    rules: Object
  },
  methods: {
    async validate(cb) {
      let children = this.$broadcast("elFormItem");
      try{
          await Promise.all(children.map(child=>child.validate()));
          cb(true);
      }catch{
          cb(false)
      }
    }
  }
};
</script>
2
3
4
5
6
7
8
9
10
11
12
13
14
15
16
17
18
19
20
21
22
23
24
25
26
27
28
29
30
31
10.改写校验方法
methods: {
    validate() {
      if (this.prop) {
        let rule = this.elForm.rules[this.prop];
        let newValue = this.elForm.model[this.prop];

        let descriptor = {
          [this.prop]: rule
        };
        let schema = new Schema(descriptor);

        return schema.validate({ [this.prop]: newValue }, (err, res) => {
          if (err) {
            this.errorMessage = err[0].message;
          } else {
            this.errorMessage = "";
          }
        });
      }
    }
  },
mounted() {
    this.$on("validate", () => {
      this.validate();
    });
}
2
3
4
5
6
7
8
9
10
11
12
13
14
15
16
17
18
19
20
21
22
23
24
25
26
补充:
关闭eslint
module.exports = {
    devServer: {
      overlay: {
        warnings: false,
        errors: false
      }
    }
}
2
3
4
5
6
7
8